Nutanix Community Edition (CE) installs,
fully automated.

Stop clicking through the CE wizard by hand. Generate one small bootable ISO, boot it, and let it build, configure and brand the entire cluster on its own - AHV, the CVM, disks, network, storage, NTP, even Prism Central. On bare metal, or as nested VMs on Nutanix, VMware vCenter / ESXi or Proxmox VE - single node or a three node cluster.

Everything the manual install does, done for you

One small Windows app runs a local webserver that hosts the CE ISO, a generated answer file (arizona.json) and a firstboot script, and drives the whole install from boot - AHV, the CVM, Prism Element and optionally Prism Central - to a ready-to-use cluster.

🔍

Node Inspector included

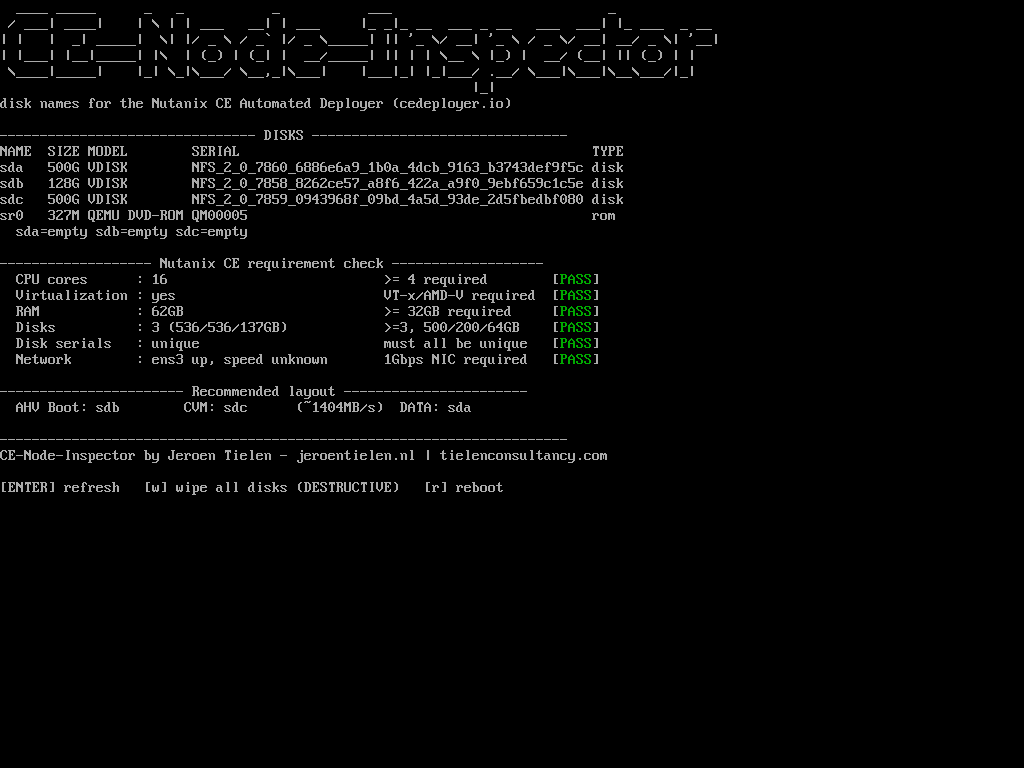
A standalone bootable ISO you run on a node before deploying CE on it - checks CPU, RAM, disks, virtualization support and NIC speed against CE's requirements, and shows the exact disk layout to use (sda, sdb, nvme0n1, ...) directly on screen.

⚡

Fully unattended

No wizard, no keyboard needed at the target machine. Boot the generated ISO and walk away - Phoenix images AHV and the CVM, then cluster creation, storage, NTP and networking configure themselves.

💻

Boots BIOS and UEFI

The generated ISO boots correctly whether you attach it as virtual media, write it to a USB stick, or mount it in a VM - real dual El Torito boot support.

🏗️

Prism Central included

Optionally deploys Prism Central automatically, registers it to the Prism Element cluster, and enables Intelligent Operations and Pulse - no extra steps.

🔄

Self-updating

Built-in update mechanism keeps the app current without ever touching your existing configuration or previously generated installs.

📡

Live progress monitoring

Flip a switch to watch an installation's progress in real time - which step it's on, per node, straight from the target's own logs. It tells you clearly when and why an install stopped, and turns itself off again once the install finishes.

☁️

Deploy onto Nutanix, VMware or Proxmox

Connect a Prism Central, a vCenter or ESXi host, or a Proxmox VE node or cluster, and the app puts the ISO(s) there, creates the CE VM(s) with nested virtualization and starts them - one button each. When you're done, one more button removes everything it created, and nothing else.

🧩

Three node clusters

Pick a three node cluster and nodes 2 and 3 are filled in for you from node 1's hostname and IPs. All three install side by side, and node 1 builds one cluster from all three once their CVMs are up.

🛡️

Network & firewall overview

An animated diagram of every connection a deployment makes - local and to the internet - with the matching firewall rules, measured on a real deployment. Pick an installation to see its actual IP addresses. See all ports and firewall rules without installing anything.

How it works

From an empty form to a running cluster, in four steps.

Upload your Community Edition ISO

Upload the official Nutanix CE ISO you download yourself - it's extracted once and reused for every install.

Fill in the form

Cluster name, AHV and CVM network details, disk names and (optionally) Prism Central - all in one page. It becomes the answer file (arizona.json) that Phoenix and the firstboot script read automatically.

Boot the generated ISO

Attach it as virtual media or write it to a USB stick, on the target machine - or let the app create the VM(s) on your Nutanix, VMware or Proxmox infrastructure and start them for you.

Walk away

Phoenix images the disks, the CVM boots and the Prism Element cluster gets created, and every post-create step runs automatically until it's ready to use.

Watch it in action

Two videos: downloading and setting it up, then a full unattended install start to finish.

Download and initial setup

Full walkthrough

Every step above, start to finish - including a real Node Inspector check and a real Community Edition install.

See it in action

The whole app in one page - from source ISO to a ready-to-boot generated install.

CE-Node-Inspector booted on a node, showing detected disks, a Nutanix CE requirement check and a recommended disk layout
CE-Node-Inspector - boot the companion ISO on a node to check CE requirements and get a recommended disk layout, before you deploy.
CE Deployer dashboard showing source asset status, Nutanix Next account check, and generated installations
Dashboard - source ISO status, Nutanix Next account check, and every generated installation in one place, with one-click deploy to Nutanix, VMware or Proxmox.
New Installation form set to a three node cluster, showing the hostnames and IPs nodes 2 and 3 get next to node 1's fields
Three node cluster - nodes 2 and 3 count up from node 1, shown right next to its fields while you type.
Network and firewall page: a diagram of every connection a deployment makes, local and to the internet, with ports
Network & firewall - every connection and port a deployment needs, per feature, with your installation's real IP addresses. Try it online.
New Installation form showing cluster identity and network fields
New Installation - cluster identity, AHV and CVM networking, all in one form.
New Installation form showing disk, network subnet and Prism Central fields
Disks, network subnet, and optional Prism Central deployment.
The in-app Help / Manual tab, covering setup through troubleshooting
Help / Manual - the full manual, right inside the app.
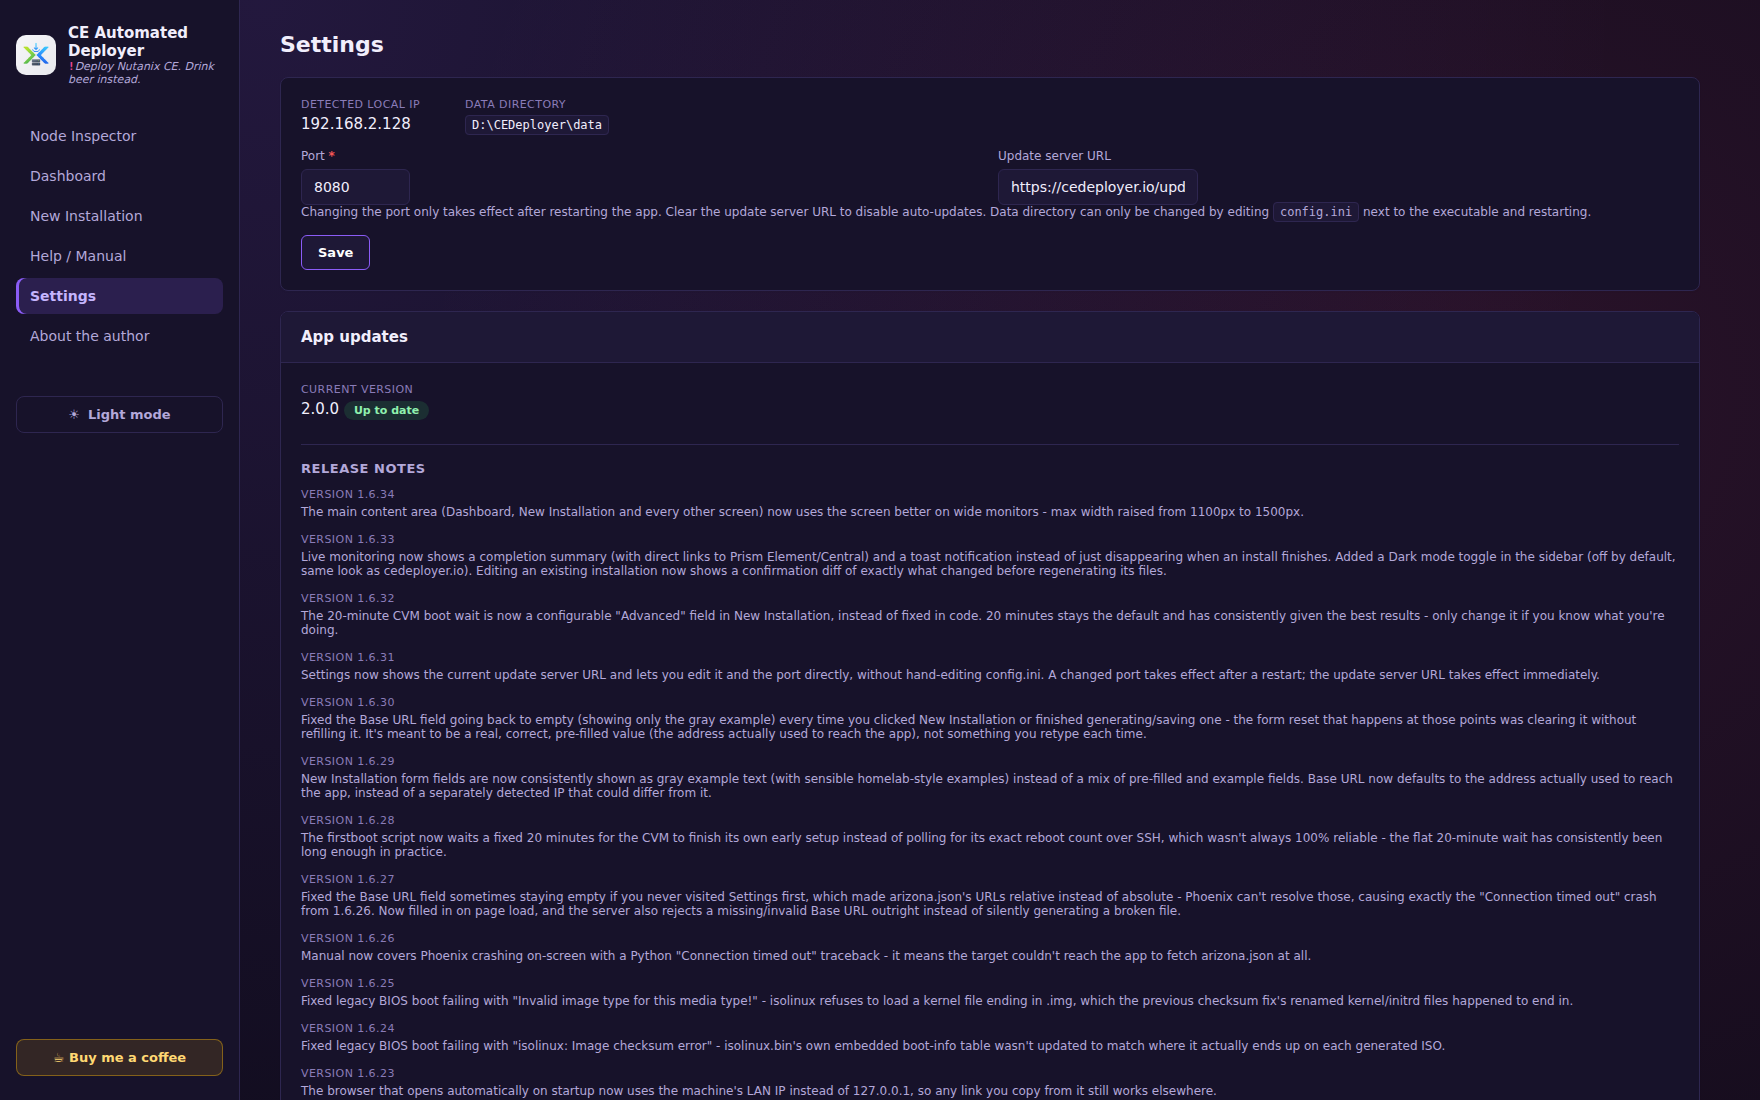
Settings page showing port, update server URL and full release history
Settings - update server, port, and the full release history, without leaving the app.

What you'll need

The official Nutanix Community Edition ISO

Downloaded by you directly from Nutanix - this app doesn't bundle or redistribute it, you supply your own.

A Nutanix Next account

A my.nutanix.com account in the NOS_CE group is required for Community Edition to run at all, not just to download it - free to register if you don't have one yet.

A Windows machine

To run the app itself - it hosts a small local webserver the target machine talks to during install.

Nutanix, VMware or Proxmox (optional)

Only to deploy CE as nested VMs (required for a three node cluster): a Prism Central, a vCenter or ESXi host (not with the free ESXi license, its API is read-only), or a Proxmox VE node or cluster. Prism Central fetches the ISOs from the app; vCenter and Proxmox get them pushed by the app.

Behind a firewall? See which ports to open, per feature, as a list you can download or print for your network team.

⬇️ 172 downloads so far

Get your download link

Leave your email and we'll send you a link right away. The link stays valid for 3 hours.

Got feedback?

Bug reports, feature ideas, or just how it went for you - all welcome.

What's new

Currently on version 3.5.0.

v3.5.0

Version 3.5 adds VMware and Proxmox VE next to Nutanix: connect a vCenter, a standalone ESXi host or a Proxmox VE node or cluster on the Infrastructure page, then upload the ISO(s), create the CE VM(s) and have the cluster built with one button each, single or three node. The app is now called CE Deployer, with a new look and a calmer Dashboard: two menus per installation, all addresses in one column, labels for the node count, where it runs and the Prism Central size, and Live as a status you click. Remove from infra now asks what to remove. Installs are more reliable too; regenerate your existing installations to get the improved install script.

Full release notes

VMware: vCenter and ESXi

  • The Infrastructure page now also connects to a vCenter, or to a standalone ESXi host.
  • Upload ISO(s) to infra pushes the boot ISO(s) to a datastore you pick (the largest one by default). The app sends them itself, so vCenter never has to reach the app.
  • Create VM(s) & cluster on infra creates the CE VM(s) the way the guide on jeroentielen.nl describes: Rocky Linux 64-bit guest, BIOS, thin disks on a VMware Paravirtual SCSI controller, a VMXNET3 network card, nested virtualization and disk.EnableUUID. Single node and three node.
  • The port group has to allow Promiscuous mode, MAC address changes and Forged transmits. The app doesn't change it, but reminds you.
  • A direct ESXi connection to a host that a vCenter manages shows a warning: VMs removed there stay behind in vCenter, so use the vCenter connection instead.
  • The manual explains why the VMs use BIOS and not UEFI: BIOS has proven more stable, and UEFI (with Secure Boot off) measured no faster.

Proxmox VE

  • Connect a Proxmox VE node or cluster with the same username and password as its web UI. Nothing has to be set up on Proxmox itself.
  • Pick a node, a bridge or VNet and a storage. The boot ISO(s) are pushed to the storage, checksum-verified, so only this app needs to reach Proxmox (port 8006).
  • The CE VM(s) get BIOS, nested virtualization, virtio-scsi disks with serial numbers made from the installation id, and SSD emulation on the CVM boot disk. For a three node cluster each CE node can go to its own Proxmox node.
  • Run Proxmox on bare metal: CE nested inside a nested Proxmox is far too slow to be usable.

Dashboard

  • Two menus per installation instead of six buttons: Infra (upload, create, remove) and ⋯ (edit, regenerate, delete).
  • All addresses in one column: per node the host and CVM, then the cluster and Prism Central.
  • Labels under the cluster name show the node count, where it runs (On Nutanix, On VMware or On Proxmox) and the Prism Central size.
  • Live is now a status you click: Live off, the current step with a green dot, Done or Stopped. The log and the infra panels have an X to close them.
  • Remove from infra asks what to remove: the VM(s) and ISO(s), only the VM(s) or only the ISO(s).
  • Every other installation has a shaded background.

New name and look

  • The app is now called CE Deployer, matching cedeployer.io, with a new logo and the tagline "The "foundation" Nutanix CE was missing."
  • Settings is now called Settings / Update.
  • Dark mode: links in messages are readable again and the main buttons keep their colour.

Network & firewall

  • Covers vCenter / ESXi and Proxmox VE too.
  • The rules for the CVMs include the iSCSI Data Services IP, plus a rule for Prism Central to it (TCP 3260).

More reliable installs

  • Renaming the storage pool is retried, since it can hang right after a three node cluster is created.

Good to know

  • On VMware the disk serial numbers come from vSphere and are longer than AHV 11 accepts. Before upgrading such a cluster to AHV 11, follow the disk serial steps in the upgrade guide on jeroentielen.nl.

Upgrading

  • Regenerate your existing installations to get the improved install script.
v3.0.0

Version 3.0 deploys CE onto your existing Nutanix infrastructure: connect a Prism Central on the new Infrastructure page, then upload the ISO(s), create the VM(s) and have the cluster built with one button each, and remove everything again just as easily. New Installation can now also create a three node cluster (as nested VMs), with nodes 2 and 3 filled in for you; node 1 builds one RF2 cluster from all three once they're up. Live shows the status per node and clearly says when and why an install stopped, and the new Network & firewall page shows every port and address a deployment needs. Installs are more reliable too; regenerate your existing installations to get the improved install script.
Full release notes

Deploy onto existing Nutanix infrastructure

  • New Infrastructure page: connect a Prism Central (v4 API) and see its clusters, subnets, storage containers and ISO images.
  • Upload ISO(s) to Prism: puts an installation's boot ISO into Prism Central's image service.
  • Create VM(s) & cluster on Prism: creates the CE node(s) as nested VMs (nested virtualization always on) with your choice of storage container, subnet, ISO, sockets, cores, memory (suggested from the Prism Central size) and disk sizes, and powers them on; they install and build the cluster by themselves.
  • Remove from Prism: deletes the VMs and images this app created for an installation, and nothing else.

Three node clusters

  • New Installation starts with a choice: single node (as before) or a three node cluster, deployed as nested VMs.
  • Nodes 2 and 3 get their hostnames and IPs counted up from node 1, shown while you type and editable.
  • Node 1 waits until all three CVMs are up, then creates one RF2 cluster from all three CVM IPs and configures it as usual, Prism Central included.

Live monitoring

  • Status per node for three node clusters.
  • A red "Stopped" when the install script gives up, with the reason and how to retry; retries are picked up automatically.
  • Long log lines wrap.

Network & firewall page

  • An animated diagram of every connection a deployment makes, switchable per feature, with the matching firewall rules, mostly measured on a real deployment.
  • Pick an installation to see its real IP addresses; hover or click a component to see only its rules.

More reliable installs

  • Three node clusters get their virtual switch created automatically.
  • The iSCSI Data Services IP step retries; a retried run doesn't fail on steps that are already done.
  • The Prism Central deployment may take up to 3 hours (nested is slow).
  • New Installation refuses an installation whose IP addresses aren't all different.

Smaller things

  • Dashboard first in the menu, clearer buttons and panels, and the manual updated throughout.

Upgrading

  • Regenerate your existing installations to get the improved install script.
v2.0.13

Live progress of an installation now also shows in the app's own console window, not just on the Dashboard, and its stage text uses the installation's actual CVM boot wait time instead of always "20 minutes". The Dashboard's "Source assets" card is now called "CE ISO", with a shorter upload hint. "Download source ISO" saves the file under its original filename instead of "source.iso".

v2.0.7

Cleaned up two leftover login-screen "please wait" steps (cluster name/IP, NTP) that no longer did anything since that config now happens directly in cluster create - no functional change, just less noise in the log and on the login screen during install.

v2.0.6

Cluster name and external IP are now set directly via cluster create's own flags instead of a separate call afterwards - one less step in the critical path. Only the iSCSI Data Services IP (which has no create-time flag) still gets set afterwards, via ncli over SSH instead of a REST API call.